JANUARY: Irene Woods’ pattern for the Turban Knot Headband

Turban Knot Headband
Gauge: whatever is required to obtain the suggested gauge. T5 on Brother 260 bulky, 6-7 on LK 150, etc.
Cast on 36 stitches with waste yarn and ravel cord. Knit even to RC 100 for child, 120 for ladies. This is approximately 18-20”/46-51 cm. You may need to adjust this by a few rows, depending on your yarn and the tension on your machine. Remove on waste yarn.
Note: if using a standard gauge machine, cast on approximately 9” worth of stitches and knit until 17-18” for a child, 19-20” for ladies, 21” for most men.
Headband is a simple rectangle; the twist is created with special seaming technique.
Materials: any yarn that will knit to 4 sts, 5.5 rows at a slightly looser than normal tension; fabric should be somewhat stretchy and soft. Teal headband is Caron Simply Soft, wine color headband is a mystery yarn from my stash. This is a good project to use up scraps, since less than half a skein of #4/worsted/aran weight yarn is required. If you have lots of really small balls, choose a pleasing color mix, and just knit random stripes.
Sew the long seam. I used mattress stitch, but sewed half a stitch from the edge, instead of the normal full stitch.
Return the fabric to the machine to bind off the live stitches. Fold the waste yarn down out of the way. With the seam at center 0, pick up 9 main color stitches each side on the back. Now pick up the front 18 main color stitches onto the same needles.
Knit 1 row to join the layers together, then bind off. Leave a long yarn tail; it will be used to sew the twist later. I’m using the backstitch method in the photo since it makes one of the flattest edges. Stitch through stitch method should also work well. Bind off the other end the same way.
Work in all of the yarn ends except the one that will be used to seam the twist. Mark the side with the seam; I used a safety pin. It is important to know for sure which side has the seam; this will be the outer layer when stitching the twist.
Fold the fabric lengthwise. Be sure the seam side is the outer layer. Bring the folded ends together with the folds on the outsides, as shown.
Slide the back side of the right half inside the left half. The fabric layers are now stacked on top of each other.
Thread the yarn tail into the yarn needle. Take the needle under the bind off edge of the first stitch, making sure it goes through all four layers. Now turn the needle toward you and come back through the next stitch, again through all four layers. Repeat all the way across.
Since this area gets a lot of stress, I sewed all the way to the end, turned the work and sewed back to the beginning, turned the work again, and sewed across the third time. Fasten off securely and work in yarn end.
Copyright 2019 Irene Woods. All rights reserve
FEBRUARY:Basic Baby Hat 2020
BSKnitting Designs – Susan Adams
This pattern has been adapted from the brother Baby Collection book 3 printed in England – I could not find a
date.
Basic Hat
This basic hat will be one of the blank pallets to learn new techniques in 2020.
HAT SIZING CHART
circumfrence length
newborn 12 – 14 IN 5 IN
0-3 mo 14 – 15 IN 5.5 IN
3-6 mo 15 – 16 IN 6 IN
6-12 mo 16 – 17 IN 6.5 IN
12-24 mo 18 – 19 IN 7 IN
2T – 4T 19 – 20 IN 7.5 IN
Child 21 – 21 IN 8 IN
Teen – adult 21 – 23 IN 8.5 IN
Knit swatch and calculate your gauge. __________stitches/inch __________rows/inch
RC000 Main color: E-wrap cast on appropriate number for the size chosen to knit. CO:___________
Make a rolled hem – knit 2 rows at MT minus 3 full numbers, 4 rows at MT minus 2 full numbers, 2 rows at MT
minus 1 full number, RC008
Knit the body of the hat with your stitch pattern (see Stitch Patterns: Long Stitch)
Reductions for top of hat: Move every third needle one stitch over and leave the empty needles OUT of work as
for a 2×1 mock rib. Tighten tension one full number K10 (10,12,12) R.
Scrap off then re-hang the groups of 2 stitches onto an every other needle set-up. Tighten tension one full
number, K6R. On every other needle.
Cut a long tail and thread a double eye needle.
Remove from machine by pulling stitches onto needle. Pull tight, steam/press and sew up.
Stitch Patterns:
FEBRUARY 2020 – LONG STITCH & CROSSED LONG STITCH:
RC000 Using the stitch and row gauge from your swatch, calculate total number of rows needed to knit to length
for the size chosen: ________
From that number of rows, subtract; a) ½ inch worth of rows for each standard gauge sequence for crossed long
stitch, b) ¾ inch worth of rows for each mid-gauge sequence for crossed long stitch and c) ¾ inch worth of rows
for each bulky sequence for crossed long stitch. Smaller hats take 2 long stitch sequences (straight or crossed)
and larger hats can accommodate 3 or more. Remember to space the sequences out evenly over the length of
the hat putting half of the plain knitting length before and after the sequences.
EXAMPLE: using a standard machine and yarn I got a gauge of 9st/in and 11.4r/in New born size hat. Total
length is 57 rows, minus 2 crossed long stitches sequences equals 46 (45.6)rows. Minus 10 rows at 2X1 mock rib
and 6 rows 1X1 mock rib at crown of hat. Divide the 30 rows left as follows: 15 rows before first sequence, 10 in
between and 5 after 2 nd sequence.
CO 126 stitches and make a rolled hem over the first 8 rows
RC000 – Knit 15 rows. Make 1 Long Stitch sequence as follows
COL, * remove the yarn from carriage and knit by hand with a VERY loose yarn each stitch all the way back to A
position. Move Carriage to the Right (this is ok to do because the needles are all the way out of work in A
position) Re-thread yarn into carriage. Using your cast on comb carefully pull evenly on the fabric to pull the
needles all the way out, the long loops will be in the hooks of the needles. Push fabric back against the
machine*
Knit rows calculated for in between sequences and repeat * to *
K rows for after the last sequence
Knit the reductions for the top of the hat as follows:
Move every third needle one stitch over and leave the empty needles OUT of work as for a 2×1 mock rib. Tighten
tension one full number K10 (10,12,12) R.
Scrap off (or use garter bar) then re-hang the groups of 2 stitches onto an every other needle set-up. Tighten
tension one full number, K6R. On every other needle.
Cut a long tail and thread a double eye needle. Remove from machine by pulling stitches onto needle. Pull tight,
steam/press and sew up.
Long stitch variations:
3) Long Stitch with contrast color: When ready to knit long stitch sequence, remove but do not cut MC
yarn, thread CC K1R * to * as above K1R still with CC, Remove CC, push in PART buttons, move carriage
across bed, rethread with the MC yarn. Knit rows for in between sequences and repeat.
4) Crossed Long Stitches: once long stitches are formed and needles are pulled out ONLY to B position (not
all the way out) “cable” crosses can be made across the whole garment before knitting the closing row.
Crossed Long Stitch on Newborn Baby Hat by WT

March:
Mock Cables:
Knit a swatch as follows: CO 50s L25 – R25 with waste yarn Knit 10 rows. Change to MC. K50R in MC and MT stockinet stitch for a base. Change to waste yarn and K10R. Switch back to MC, move stitches over one either left or right and leave empty stitches out of work as per the chart below: X=STITCHES, O=OUT OF WORK needles – not that there are three stitches between the out of work needles in each grouping. This needle set up allows for each of the three different cables.
XXXOXXXOXXXOXXXXOXXXOXXXOXXXXOXXXOXXXXOXXXOXXXOXXX
Knit in MC with the needles out of work for 50 rows. Knit 10 rows in CC and bind off. Lightly steam flat.
Making the “cable”: Using a piece of yarn in a double eye needle follow directions on the sewing up chart to shape the mock cables. Launder and let rest over night before measuring. These techniques not only bring the swatch in (altering the stitch gauge) but also shortens the swatch (altering the row gauge) – each technique brings a different amount of change to the stockinet so please set it up to try them all before deciding which cable you will ultimately use for your garment.
RC000 Using the stitch and row gauge from your cabled and laundered swatch, calculate total number of rows needed to knit to length for the size chosen (from the hate size chart above): ________ and stitches needed for circumference ___________ of the hat.
Start this hat with waste yarn and ravel cord over all needles. Make the rolled hem with all needles in work and then transfer the stitches to set up for the cables – after the hem but before knitting the hat. Knit the hat to the crown, change the stitch set-up for the top and run a gathering thread through the top but don’t gather until after you have stitched up the cables.
April:
Wendy and I have prepared a fun technique this month: Multi Color Short Rowing.
This is a great way to add color in any garment for a color blocking effect. It can be as simple or intricate as you like and there are great resources out there to continue your education on multi color short rowing. Sandee Cherry has a book all about this technique including making striped short rows and centered diamonds and more. I have a copy if anyone would like to borrow it.
Remember that with the Chipmunk sweater it is only in your library at Knit It Now if you are a free subscriber and have asked Wendy to have it added OR you are a paid member.
Multi Color Short Rowing:
Multi-color short rowing is accomplished by first casting on all of the required needles. Set the Carriage to HOLD (H). Then, by pulling needles into hold position in succession while knitting the first color, you get a wedge of color one. The second color is knit beginning with the first needles that were put into hold while bringing needles into work in the same succession as they were selected for hold. The most important thing is to return the needles to work in the same sequence as they went into hold. Wrapping the hold stitches will eliminate any holes but it is not necessary – a hole will be made if no wrapping is done.
Swatch: for your swatch cast on over 25L – 25R in color one. Knit 50 rows for the first part of the swatch, set carriage to Hold, RC 000, bring 2 needles to HP on the left edge, K2R, bring the next 2 needles to work, K2R and repeat until all of the needles are in HOLD (the last needles to go into hold are the ones on the right edge). All needles are in Hold so it is safe to move the carriage to the left with no yarn in it prior to changing to the second color yarn. With the second color yarn, put the left 2 needles into upper working position, K2R, add next 2 needles to upper working position (UWP), K2R, repeat until all needles are in work. Waste off & bind off. Wash and dry as you intend to launder the finished garment. Measure swatch for stitches and rows. ST_________/in, ROWS _________/in
Here are pictures of Susan’s hat and Chipmunk sweater.
#1 #2
#3 #4
HAT: Using the chart in the beginning of this pattern, calculate your stitches and rows for the hat size you intend to knit. CO ___________ stitches, knit ______________rows for the hat size _____.
For the sample hat I used 3 colors and short rowed the blue in the center <see picture #2>. This was accomplished by casting on 140 stitches, knitting the rolled brim in blue, placed all of the left side of 0 in hold, short rowing in peach from center 0-1R 2 stitches every other row until all of the right side is in hold also. Note row count here ________. Because all needles are in H, move empty carriage to left, add second color. Put all of the left side needles into UWP, switch to green, knit 2 rows on those left side stitches, COL, put the first two needles at the center of the bed (the right most of the current working needles, opposite carriage) into H, K2R, continue adding 2 needles to H and K2R until all the needles on the left side of the bed are in H.< see picture 3> Remove second color and add third color (blue). Return the center 2 needles to UWP K1R, COR, * add the next 2 needles to UWP opposite the carriage (they will be on the left of 0 the first time and the right the second time), K1R *, <see picture #4> repeat from * to * until the entire bed is in work. You will be adding 2 stitches into UWP EVERY ROW opposite the carriage. Once the whole bed is in work, set row count back to where you noted it. Continue knitting the hat in the last color to the row needed for the size desired. More every third needle and knit in a 2 X 1 mock rib to finish the crown as we have been all along. Gather off the machine with a long tail, steam and sew up.
<see picture #2>The sweater is knit by logging onto the Knit it Now website, putting your gauge in the Chipmunk Sweater which will give you your basic pattern. By looking at my sample you can see where I short rowed the back, just did color changes, AKA stripes, (no short row required) over the shoulders and did the short rowing in color on the two fronts.
TIPS: 1) If you do not worry about wrapping the stitches as you add them to hold it is easier to learn this process – but remember that you end up with a hole. 2) Selecting different colors in the same yarn will help insure the gauges match (different colors don’t always give the exact same gauge)Short Rowing in Color Take TWO:
To practice this technique, Wendy used DAK to help her plan her project. (A sheet of knitting grid paper would work, too) and is available online (http://www.theknittingsite.com/knitting-graph-paper/ ). Just fill in what your gauge is, and print it off). Wendy knew what the gauge for this yarn was: 7 st/11 rows per inch at T7 on a standard. To make a hat for a 3-6 month old, she needed to have a piece 105 st x 60 rows. The rolled hem and the 16 row reductions for the top were not included in this piece for planning purposes, as she planned to knit them in stockinette in the main color according to the basic pattern.
Here’s a picture of what Wendy came up with in DAK:
It was fun to try out different shapes, using the “line” tool to mark an outline and then fill it with the “paint can”. When she was ready to knit, she looked at the
pattern in Interactive Knitting, and it helped sort out exactly what needles to put into work, and what
was in hold.
To knit this little hat, Wendy knit the rolled hem, and then put everything into hold. She knit each of the 3 triangles, one at a time, wrapping on both sides. Decreases were made every 4 rows. Then she used the background color, pink, to short row around those triangles. I knit 4 rows between each increase, and didn’t wrap anything. Wendy knit the increases beside the big triangle first, to the tops of the short triangles, then did each side to the top of the big triangle. Then I did the crown decreases. Here’s how
my
May:
Wendy’s Baby Socks Pattern for Standard Gauge
Fingerling or 2 strands of 2/24 for the smallest sizes, using T5-6
3 strands 2/24, T7 for ages 6 mth…
Leg: Perfect Selvedge: Set up for 1×1 rib over 33 needles, T 0/0. Leaving a 12 inch tail, knit the zig zag row. Insert comb. Knit circular for 1-3 rows at T1/1.
Cancel circular. Add 2 small ribber wts. T 5/5, knit 26 rows rib.
Pre-Heel: Transfer ribber stitches to main bed. Lower ribber. Change to regular sinker plate and knit 10 rows at T 7.
Remove cast on comb and ribber wts. Use 2 claw wts.
Heel: Carriage to Hold. Put all needles opposite 0 into Hold. Put 1st stitch beside carriage into Hold, knit 1 row. 10 times. 7 stitches remain. * Reverse by putting 1st stitch opposite the carriage into UWP (upper working position) and knit 1 row. Continue until all heel stitches back into work. * When I pull the last stitch to hold for the decrease, I also push down the 1st needle on the other side of the work. This starts the increases AND puts the yarn where I want it at the end of the increases. Cancel Hold
Foot: knit 26 rows. 2 claw weights.
Toe: Carriage to Hold, same as heel. Leave a 12 inch tail. Scrap off with 6-10 rows of waste.
Kitchener toe and Bickford seam for inseam. I kitchener from the knit side of the fabric, and start by picking up 3 stitches on each side, then go 1 stitch at a time, then 3 stitches on each side at the far side. This gets rid of “dog ears”.
Bickford seam is done from the right side. If you look this up, directions will say to pick up a loop on 2 side then pick up a loop on the other side…… I prefer to pick up a loop on 1 side, a loop on the other side, then a knot on this side, then a knot on the other side….. This seam is flat and almost invisible.
Second Sock: Reverse the side of the sock that you knit the heel and toe.
Converting a pattern from one gauge to another: What a great formula to have in your arsenal.
In our example we will convert from a standard machine (4.5mm) to the LK150 (6.5mm). This same formula works for conversion of a pattern from any machine to any other. THIS DOES NOT REPLACE THE GAUGE SWATCH – the formula is a starting point once the new yarn/machine gauge swatch has been measured and calculated.
- Multiply the number of stitches you are working with by the gauge of the machine this number applies to. Baby sock cast on is 33st X 4.5 = 148.5
- Divide that result by the gauge of the machine you wish to use to get the number of stitches you will need for this different gauge machine. 5/6.5 = 22.84 SO 23st cast on
- This procedure needs to be followed for any part of a pattern that has stitch shaping – you would need to re-calculate the number of stitches to bind off at the under arm for example.
- ROWS – the same formula can be used to convert rows. Wendy’s pattern has 26 ribbed rows and 10 ankle rows for a total of 36 rows before the heel. 36 X 4.5 = 162 162/6.5 = 24.9 (25rows)
- Stitches remaining in the heel after short-rowing: 7 X 4.5 = 31.5 31.5/6.5 = 4.8 (5sts)
- Foot Length: 26 rows 26 X 4.5 = 117 117/6.5 = 18 rows for the sole
I hope this empowers you to use that pattern you are so fond of with a different gauge machine.
BABY SOCK for the LK150 Mid-gauge:
Using 3 strands of 2/24 yarn, E-wrap cast on over every other needle between L 11 and R12. Hang cast on comb with hooks facing for ease of hanging. Knitting on every other needle for the inside of the cuff. (Reverse centering for the second sock). T1+
Knit 9 rows COL add needles K1R at T2+. K9 rows COR Hang Hem by putting the loops from the EON e-wrap onto every other needle. MT +1 K1R to close hem.
RC000 MT (T2+) K16R. (15 for the second sock)
HEEL: Carriage set to HOLD. Pull all needles left of 0, opposite carriage into hold. Use 1 claw weight under remaining needles. Pull one needle BESIDE the carriage into hold and K1R. Repeat this until there are 4 needles left working COL and you have just pulled out the needle next to the carriage into hold. Reverse shaping by putting 1 needle back into work opposite the carriage and K1R repeating until the last needle on the right (left for the second sock) is in work. Cancel Hold.
FOOT & TOE: Knit 18 rows for the foot and then shape the toe as you did the heel. When the last needle on the right edge is in work there is still one needle to the right of 0 that needs to go into work. Push that to UWP and knit to the left. Cut yarn and leave a 12” tail – the tail is in the center of the sock.
Scrap off 4 rows and remove from machine. Kitchener the live stitches together OR: Hang with right sides facing on ½ of the needles doubling up one because of the stitch count difference left and right of 0. Bind off using the needles as gate pegs. The yarn will be at the edge for seaming.Foot Size Chart for babies
Preemies
1-2 lbs
Foot Length 1″ – 1 3/4″
2-3 lbs
Foot Length 2″ – 2 1/2″
3-5 lbs
Foot Length 2 1/2″ – 3″
5-7 lbs
Foot Length 3″ – 3 1/2″
7-9 lbs
Foot Length 3 1/4″ – 3 3/4″ (most needed size for newborns)
3 -6 months
Foot Length 4″ – 4.5″
6 months – 1 year
4.25″ – 4.75″
18 months – 2 years
Foot Length 4.5″ – 5.5″
2 years – 4 years
Foot Length 5.5″ – 6″
August:
Slip Stitch Thumbless Baby Mittens (0-6 mth: approx. 2.75 in wide and 4.5 inches long)
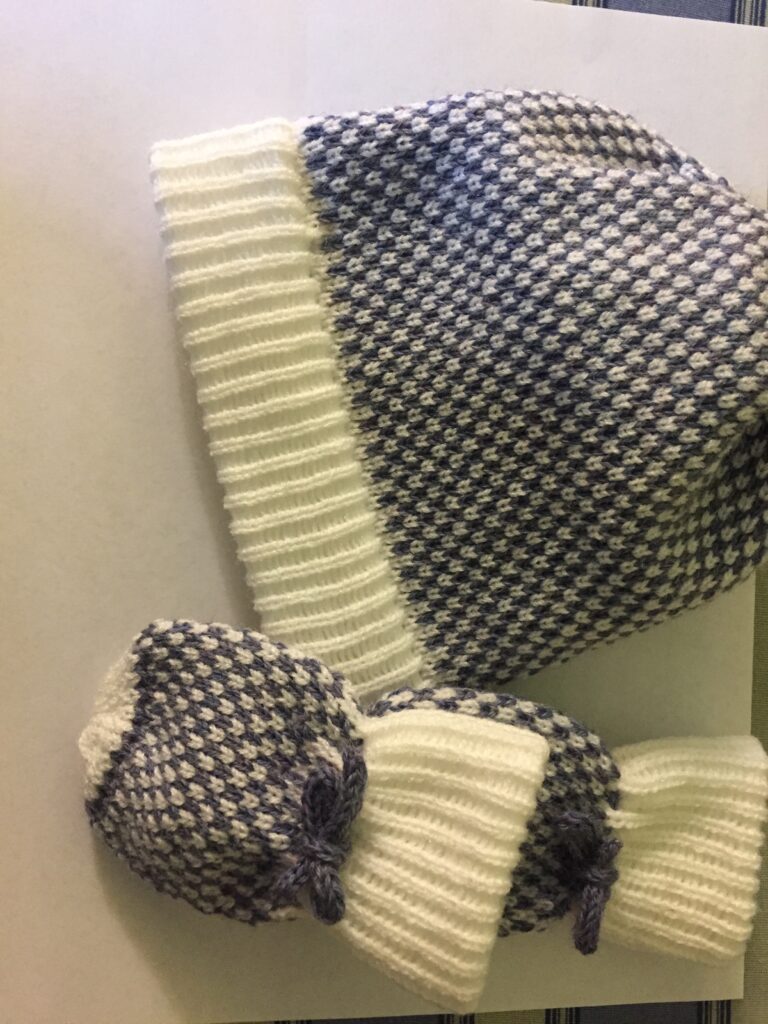
Yarn: fingerling wt. Pictured is unknown scrap yarns from my remnant box. Sock yarn would be a good choice. Knit on a standard gauge punchcard machine, using Card 1 at Double High.
8.5 stitches and 14 rows per inch.
Mock Rib cuff: Row count 000: T4, Every other needle (EON) between L 24- R23. (24 needles in work). E-wrap cast-on. Hang cast-on comb and wts. I used 2 claws, but this is a bit light and I had some stitches wanting to jump off.
Knit 40 rows.
Hang cast-on stitches onto the empty needles (48 needles in work). Re-hang cast-on comb and weights. Knit 1 row to complete hem.
Hand: Insert the punchcard and Lock it so that it can’t turn. T6. KCII so end needles don’t select. Knit 1 row to select needles. Set the punchcard to double high.
*Change to contrast yarn and knit 2 rows. Change to main yarn and knit 2 rows.*
Repeat for approx. 36 rows, or until mitten measures approx. 4.5 inches, including cuff.
With main yarn, transfer stitches into Every-other-Needle, T4, knit 4 rows. Leave a long tail. Take off in the round.
Finishing: Pull the top tight and stitch through it a couple of times to reinforce, then sew the side seam. Add an i-cord tie (2 needles, T3, 160 rows).
Bonus: Hat: Using the same techniques as the mittens, start with every other needle L 50 – R 49. Make cuff same way. I knit the main part of the hat until it measured 6 inches, then did the final 4 rows. (submitted by Wendy Taber)